Updated on 10/13/20.
Problem scenario
You want to deploy a Kubernetes cluster in AWS. You have an Ubuntu server (e.g., with a nano flavor in AWS or a minimally powered Azure instance). It has no software packages installed on it (e.g., it does not have Docker or Kubernetes). How do you deploy Kubernetes in AWS?
Solution
Warning: This will automatically create EC2 servers in you AWS account behind the scenes. It will cost money to do this. The conjure-up program uses Juju and will create multiple machines of the medium flavor. Your AWS account will be billed if you follow these directions.
1. Log into an Ubuntu server using Putty. (This machine does not have to be in AWS. The machine does not need much RAM or more than one vCPU.) Maximize the Putty window.
2.a. As a regular user (the user cannot be root here), enter this command:sudo snap install conjure-up --classic
2.b. Run this command (and follow the subsequent interactive prompts): juju add-credential aws
2.c. Run this command: conjure-up kubernetes
2.d. If you get prompted from the "conjure-up kubernetes" command, choose "y".
3.a. At the menu of choices, choose "Kubernetes core."
3.b. For "Where would you like to deploy?" choose "AWS" and press enter.
3.c. To the next prompt for credentials, choose the appropriate one.
4. Choose "Deploy New Self-Hosted Controller." Do NOT choose Juju-as-a-Service (JaaS) Managed controller.
5. 'For the "Network Plugin" option, choose flannel.'
6. Enter the password for the ubuntu user at the prompt for a "sudo" password.
7. When prompted, choose "DEPLOY". (This will deploy all seven remaining items.) When you see "Juju Controller is initializing. Please wait." You may observe a delay on the step that says "Attempting to connect to x.x.x.x:22" You may want to make sure your Ubuntu server is in a security group that accepts inbound connections to the IP address x.x.x.x.
8. The next steps may take 30 minutes. You may want to monitor progress by watching two things. First you may want keep an eye on your Putty session to your Ubuntu virtual server. For example, it will look like this:
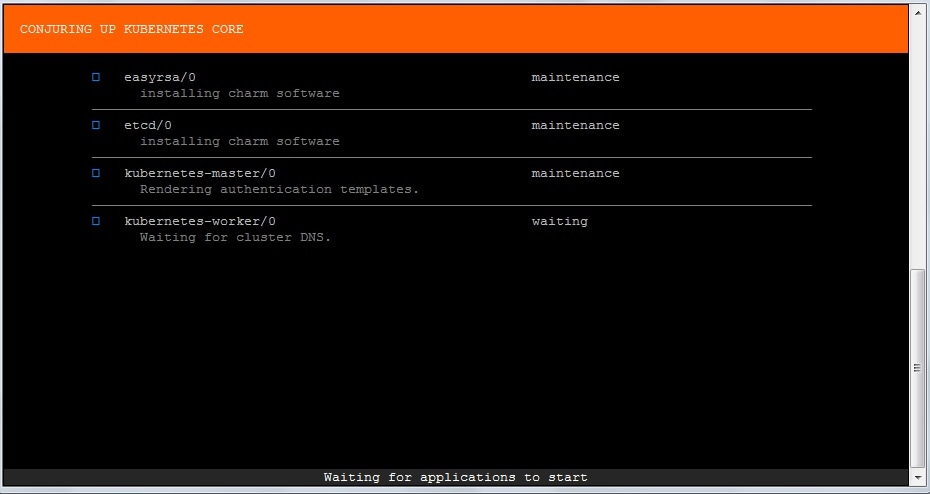
You do not need to be logged into the AWS console. If you are logged into the AWS console with your web browser, you may also want to refresh your "Instances" dashboard to watch the EC2 machines being created. Depending on which AWS region you chose, you may need to change the region. You will probably see a message that says "Your big software is deployed, press the (Q) key to exit." Press the "q" key. You may be prompted "Do you want to quit?", choose "yes".
9.a. If your Putty session to your Ubuntu server prompts you, choose "Run" to "Download the kubectl client program to your local host." If you did this, choose "Run" again to the prompt about "kubectl get nodes" etc.
9.b. You may just see "Your deployment is now complete." You will see a message about your deployment being complete. You can go to the URLs (via a web browser) as they are listed. If you do, you will be prompted for credentials. To find these credentials, go to the Putty session and press "Enter" to quit.
(Instead of seeing that your deployment is complete, you may see a message about a problem with the installation. This may or may not be ignorable. Copy the path(s) to any relevant logs. You may want to review them. You may be able to proceed as if nothing was wrong. You may not see the URL you need. If that is the case, step 9c may help you.)
Then run this command: kubectl config view
The results of this command will give you credentials for the "admin" user for the web UI (aka Kubernetes dashboard).
9.c. The URL in the above command's results is for the APIs. You'll see various API options (for future RESTful development etc.) if you go to it. From the command prompt of the Linux server from which you set up Kubernetes with, run this command to find the URL of the dashboard of the newly deployed Kubernetes cluster:
kubectl config view | grep server | awk '{print $2"/api/v1/namespaces/kube-system/services/https:kubernetes-dashboard:/proxy/"}'
The resulting URL from the command above is for the real GUI dashboard. Go to the URL via a web browser and if you are prompted to upload a kube config file for authentication, clicking "Skip" may work for testing in a non-production environment.
10. Remember to delete those new AWS EC2 instances or your bill will be higher than you expected.