Problem scenario: You have Oracle VirtualBox installed on a Windows host. You have Linux CentOS as a guest VM. You want to test network connectivity (e.g., hostname resolution). You want to know what IP address the Linux guest could use to interact with the Windows host.
Solution Install traceroute with this command:
sudo yum -y install traceroute
Then use this command:
traceroute 8.8.8.8
The results of the above traceroute command will show you the packet hop from the Linux guest to the Windows host. Thus you will know what IP address the Windows host has insofar as the Linux CentOS guest is concerned.
UPDATE: If you are using RHEL 8.x use these directions instead of the ones below.
Problem scenario You want to install Docker on an AWS instance of RedHat Linux (version 7.x or below). You do not want to use CentOS packages. What do you do?
Solution For RedHat Linux running via AWS, you have to run one command to enable numerous yum repositories. This way yum command can install many packages and dependencies. In this case, you just want to install Docker.
# If you cannot run yum-config-manager, see these alternative directions.
# To start the Docker service, run this command: sudo service docker start # For using kubeadm, you will need to enable the Docker service. This command can help you do that: sudo systemctl enable docker
If you want to install Docker on a RHEL server in GCP, see this posting. For CentOS in GCP you simply need to run sudo yum -y install docker.
For a variety of different Docker installation directions, see this posting.
For directions on using Docker without using the root user, see this posting.
Question: How Do You Get Yum Repositories to Work with a AWS Instance of RHEL? Problem scenario: You are using RedHat Linux via AWS and very few yum commands work. The repositories are very limited, and few packages are available. When trying to use yum to install packages, you see output like this:
"Loaded plugins: amazon-id, rhui-lb ... No package lynx available. Error: Nothing to do"
It may seem like you need to register a RedHat subscription (separate from your AWS account) to enable more yum repositories to be available. You do not know the corresponding credentials for an rhnreg_ks or rhn_register command. It seems as though your server has not been configured to use the Red Hat Update Infrastructure. You do not want to manually download various .rpms to the server. You may have contemplated setting up a RedHat satellite server to get your yum repositories to work like you think they should. You do not know why it seems this complex and difficult to get some common RedHat packages with the "yum install" command. What do you do to have yum commands install packages and their dependencies?
Solution Run this command to enable optional channels:
Problem scenario: Yum commands to install packages are not working. When you use "yum install coolpackage" you get an error like this:
' http://mirror.centos.org/altarch/7/os/i386/repodata/repomd.xml: [Errno 14] curl#6 - "Could not resolve host: mirror.centos.org; Unknown error" Trying other mirror. https://yum.dockerproject.org/repo/main/centos/7/repodata/repomd.xml: [Errno 14] curl#6 - "Could not resolve host: yum.dockerproject.org; Unknown error" Trying other mirror.
... One of the configured repositories failed (Docker Repository), ...
failure: repodata/repomd.xml from dockerrepo: [Errno 256] No more mirrors to try. https://yum.dockerproject.org/repo/main/centos/7/repodata/repomd.xml: [Errno 14] curl#6 - "Could not resolve host: yum.dockerproject.org; Unknown error" '
You cannot use curl or wget properly. You try this command (with no quotes): "curl http://www.google.com"
But you get this error: "curl: (6) Could not resolve host: www.google.com; Unknown error"
What do you do?
Root cause: DNS resolution is not working for your Internet connectivity. You must configure a DNS server for your network interface.
Solution 1. cd /etc/sysconfig/network-scripts
2. Backup the interface file that governs the IP address with the default gateway. If you are not sure which file this is, follow these directions. For a standard CentOS 7.x server, the file will be ifcfg-enp0s3 file. Once this file is backed up, modify the original one.
3. Make sure these two stanzas exist in the file that governs the default gateway:
DNS1=8.8.8.8 DNS2=8.8.4.4
For example, the last four lines of this file /etc/sysconfig/network-scripts/ifcfg-enp0s3 may look like this:
Question When did automation become a division or a department in a business? When did the term automation start to be used regularly?
Answer A competitive market will push companies to be competitive. With the conclusion of World War 2, America transitioned to a peace time economy. Detroit stopped producing large numbers of tanks and started producing large numbers of cars. 1947 was the year Ford created its automation department (www.assemblymag.com). The first recorded use of the word automation was in the last half-decade of the 1940s (Dictionary.com).
Problem scenario: You are using RHEL 7.x via AWS. You want to install Kubernetes. What do you do?
Solution 1. Log into the Linux server as ec2-user. Then run this command: sudo yum-config-manager --enable rhui-REGION-rhel-server-extras rhui-REGION-rhel-server-optional
2. Create this file: /etc/yum.repos.d/kubernetes.repo 3. Have this be the content of the file (with the first line being "[kubernetes]" and the last line ending in "...rpm-package-key.gpg":
Problem scenario You want to deploy a Kubernetes cluster in AWS. You have an Ubuntu server (e.g., with a nano flavor in AWS or a minimally powered Azure instance). It has no software packages installed on it (e.g., it does not have Docker or Kubernetes). How do you deploy Kubernetes in AWS?
Solution Warning: This will automatically create EC2 servers in you AWS account behind the scenes. It will cost money to do this. The conjure-up program uses Juju and will create multiple machines of the medium flavor. Your AWS account will be billed if you follow these directions.
1. Log into an Ubuntu server using Putty. (This machine does not have to be in AWS. The machine does not need much RAM or more than one vCPU.) Maximize the Putty window.
2.a. As a regular user (the user cannot be root here), enter this command: sudo snap install conjure-up --classic 2.b. Run this command (and follow the subsequent interactive prompts): juju add-credential aws 2.c. Run this command: conjure-up kubernetes 2.d. If you get prompted from the "conjure-up kubernetes" command, choose "y".
3.a. At the menu of choices, choose "Kubernetes core." 3.b. For "Where would you like to deploy?" choose "AWS" and press enter. 3.c. To the next prompt for credentials, choose the appropriate one.
4. Choose "Deploy New Self-Hosted Controller." Do NOT choose Juju-as-a-Service (JaaS) Managed controller.
5. 'For the "Network Plugin" option, choose flannel.'
6. Enter the password for the ubuntu user at the prompt for a "sudo" password.
7. When prompted, choose "DEPLOY". (This will deploy all seven remaining items.) When you see "Juju Controller is initializing. Please wait." You may observe a delay on the step that says "Attempting to connect to x.x.x.x:22" You may want to make sure your Ubuntu server is in a security group that accepts inbound connections to the IP address x.x.x.x.
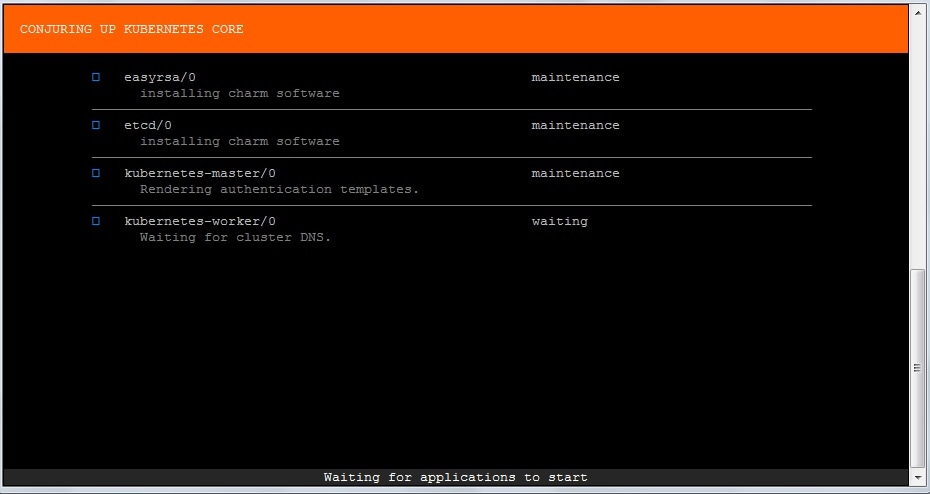
8. The next steps may take 30 minutes. You may want to monitor progress by watching two things. First you may want keep an eye on your Putty session to your Ubuntu virtual server. For example, it will look like this:
You do not need to be logged into the AWS console. If you are logged into the AWS console with your web browser, you may also want to refresh your "Instances" dashboard to watch the EC2 machines being created. Depending on which AWS region you chose, you may need to change the region. You will probably see a message that says "Your big software is deployed, press the (Q) key to exit." Press the "q" key. You may be prompted "Do you want to quit?", choose "yes".
9.a. If your Putty session to your Ubuntu server prompts you, choose "Run" to "Download the kubectl client program to your local host." If you did this, choose "Run" again to the prompt about "kubectl get nodes" etc.
9.b. You may just see "Your deployment is now complete." You will see a message about your deployment being complete. You can go to the URLs (via a web browser) as they are listed. If you do, you will be prompted for credentials. To find these credentials, go to the Putty session and press "Enter" to quit.
(Instead of seeing that your deployment is complete, you may see a message about a problem with the installation. This may or may not be ignorable. Copy the path(s) to any relevant logs. You may want to review them. You may be able to proceed as if nothing was wrong. You may not see the URL you need. If that is the case, step 9c may help you.)
Then run this command: kubectl config view The results of this command will give you credentials for the "admin" user for the web UI (aka Kubernetes dashboard).
9.c. The URL in the above command's results is for the APIs. You'll see various API options (for future RESTful development etc.) if you go to it. From the command prompt of the Linux server from which you set up Kubernetes with, run this command to find the URL of the dashboard of the newly deployed Kubernetes cluster:
kubectl config view | grep server | awk '{print $2"/api/v1/namespaces/kube-system/services/https:kubernetes-dashboard:/proxy/"}'
The resulting URL from the command above is for the real GUI dashboard. Go to the URL via a web browser and if you are prompted to upload a kube config file for authentication, clicking "Skip" may work for testing in a non-production environment.
10. Remember to delete those new AWS EC2 instances or your bill will be higher than you expected.
Problem scenario: When trying to compile a C++ program (e.g., $ gcc hello.cpp), you receive this error: "gcc: error trying to exec 'cc1plus': execvp: No such file or directory"
What do you do?
Solution Install gcc-c++. For a RedHat distribution of Linux, use this command:
Problem scenario: You want to use Oracle VirtualBox or some other hosted hypervisor with your HP Probook laptop. You need "Virtualization Technology (VTx)" enabled. How do you do this?
Solution
1. Boot up. When you see the "HP" splash screen (a blue image with a black background), press F10.
2. At the prompt, "Log in as a Guest User" choose "Yes." (This step may be crucial to your success.)
3. Go to the Advanced tab.
4. Go to "device Configurations"
5. Check the box for "Virtualization Technology (VTx)"
6. Click Save.
7. Exit and save the changes whenever you are prompted.
Problem scenario: Using the C programming language, you want to write a program that produces a file (we'll call it contint.txt) that has the following content:
1 2 3 4 5 6 7 8 9 a b c d e f
Solution Overview of the approach: Hexadecimal numbers use base 16. So "a" is the equivalent of 10, and "f" is the equivalent of 15. You want to use "%x" parameter associated with the fprintf function to convert regular (base 10) integers into their hexadecimal equivalents.
1. Create this file (we'll call it contint.c):
#include<stdio.h>
int main() { FILE *contintptr; int x;
contintptr=fopen("contint.txt", "w");
if (!contintptr) return 1;
for (x=1; x<=15; x++) fprintf(contintptr,"%x\n", x); //the "%x" translates the variable into a hexadecimal.
fclose(contintptr);
return 0; } //end of file
2. Compile it with this command:
gcc contint.c
3. Run the compiled binary: ./a.out
4. You are done. View contint.txt for your output.